Setting up a podcast camera can feel overwhelming, right? Don’t worry—we’ve figured it all out for you.
Even if you’re a beginner or looking to upgrade your current setup, this guide will give you everything you need to get started.
From picking the right camera to setting it up like a pro, we’ll break it down step by step. By the end, you’ll have a podcast setup that looks as good as it sounds. Let’s dive in!
Why a Good Camera Setup Matters for Podcasts
About 17% of podcasters, or one in five, also record video in addition to their audio. As the demand for video continues to rise, experts estimate that this figure will rise as well.
Grainy footage or bad angles can turn viewers away, no matter how great your content is.
I recently helped my client Rachel, who was setting up her podcast studio. She thought her laptop camera was “good enough.” But once we switched to a mid-range DSLR, the difference was night and day. The clarity made her podcast look more professional, and she got way more views.
Your camera setup shows people that you’re serious about your content. A sharp, well-lit video keeps viewers engaged.
Why am I prioritizing it?
On platforms like YouTube, high-quality visuals can mean the difference between gaining subscribers and losing them. Even if you’re just starting out, investing in the right setup is worth it.
But here’s the thing—
it’s not just about the camera. Lighting and positioning matter too. Rachel learned this the hard way when her first test shoot had weird shadows everywhere. A simple ring light fixed it immediately,
and now she swears by it.
Bottom line: Your audience deserves a great viewing experience. A good camera setup builds trust and keeps them coming back for more.
Key Components of a Podcast Camera Setup
When setting up a podcast camera, you need the right tools. It’s not just about the camera—you’ll also need a few other essentials to make your video look polished.
My client Rachel found this out when she tried to cut corners and realized her videos weren’t standing out. Here’s everything you need to know.
First, the camera. You’ve got options:
- DSLRs
- webcams
- or even smartphones.
For Rachel, we went with a DSLR because it gave that professional depth-of-field look. But if you’re on a budget, some webcams like the Logitech Brio deliver crisp 4K video.
Smartphones are also great if they have a decent camera, like the iPhone 14 or Samsung Galaxy S23. Just make sure you use a tripod to keep it steady.
Check out my blog where I discussed how to Build Podcast Setup with iPhone.
Speaking of tripods, don’t underestimate them. A shaky camera screams amateur. Rachel once tried balancing her DSLR on books—
it didn’t end well.
A sturdy, adjustable tripod or mount is a must. We chose the Joby GorillaPod for flexibility, especially since her studio was a small, tight space.
Next, lighting.
Even the best camera looks bad without proper lighting. Rachel’s first test had harsh shadows because she only used a ceiling light. We added a Neewer ring light, which softened her look and brightened her face evenly.
If you want something bigger, softbox lights like the Godox SL-60W are great for creating a studio feel.
Don’t forget about microphones, even though this is a camera setup guide. Bad audio can ruin a video podcast. We paired Rachel’s DSLR with a Rode VideoMic Pro, which plugs right into the camera.
Clear audio + great video = pro quality.
These components work together to create a solid podcast camera setup. Skimping on one (like lighting or tripods) can hurt the final result.
Rachel learned that every piece matters, and once we nailed her setup, she started getting compliments on her polished, professional look.
Choosing the Right Camera for Your Podcast Setup
Picking the best podcast camera can be tricky, but it doesn’t have to be. The right choice depends on your budget, setup, and how professional you want your videos to look. When my client Rachel was starting, she didn’t know whether to invest in a DSLR or stick with her smartphone. Here’s what I told her: start with what fits your needs, then upgrade later. Here are some pros and cons for a clear view:
Webcam pros and cons
Pros
- Generally speaking, webcams are affordable.
- Plug and play in a matter of seconds, making setup simple.
- Because your laptop probably has one built in, you might not even need to buy any equipment.
- The majority of cameras come with video enhancement tools that allow you to add simple changes like colors or filters.
Cons
- It’s possible that webcams don’t always capture crisp footage. Your guests who are not in the studio might not be impressed with your webcam model.
- You might not be able to use third-party webcams on your PC. Examining the technical specifications beforehand is a smart idea.
- Certain webcams are useless if your internet is spotty or nonexistent. You might require a USB webcam if you’re recording your podcast off-site.
- Webcams can produce blurry live streaming, but a strong internet connection is not necessary for local recording. To circumvent this restriction, you can use Riverside to record locally, making your internet connection practically secondary.
DSLR pros and cons
Pros
- Compared to webcams, DSLR cameras provide higher-quality video.
- You can carry them with you because they don’t need continual wires or cables.
- Numerous additional attachments, like as microphones, headphones, and changeable lenses, can be added to DSLRs.
Cons
- Compared to other podcast camera kinds, DSLRs could be more costly. For a higher-quality model, budget between $300 and $3,000.
- DSLRs can be cumbersome and challenging to carry because they are larger, heavier cameras.
- There are DSLR cameras with limited recording time. The majority of models have extra file size restrictions (often between 2 GB and 4 GB) and record for 29 minutes and 59 seconds each session.
- Recognize the additional expenses associated with the various lens kinds.
I am not going to go through all the cameras in detail in this guide and tell you which option in the best for you because I have already discussed it in Best Podcast for Podcasting. Considering your budget and other needs, select the best one for you from this blog.
Till then.. in short..
For beginners, budget-friendly cameras like the Logitech StreamCam or Elgato Facecam are solid choices. Both offer 1080p resolution, are easy to set up, and work great for single-host podcasts.
Rachel considered these but wanted something more flexible for multi-angle shots.
If you’re aiming for a more polished look, DSLR and mirrorless cameras are your best bet.
The Canon EOS M50 Mark II is a favorite among podcasters because it’s lightweight, shoots 4K, and has a flip-out screen.
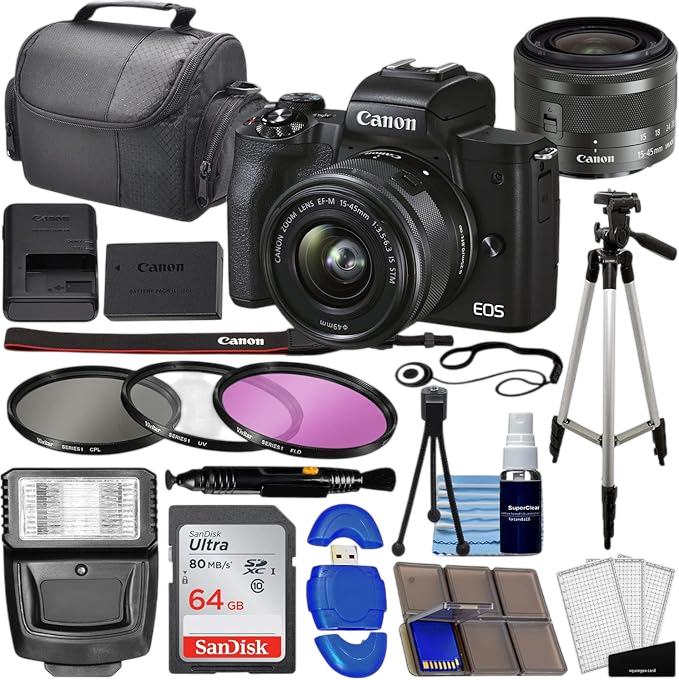
Rachel loved this feature because it let her monitor herself while recording.
The Sony ZV-1 is another great option—it’s compact, user-friendly, and has fantastic autofocus, especially for solo creators.

Once again I have made a detailed comparison of them in Best Podcast for Podcasting
When deciding, look for key features like resolution, frame rate, and low-light performance. Rachel almost picked a cheaper camera but realized its poor low-light capability would be a problem in her dim studio.
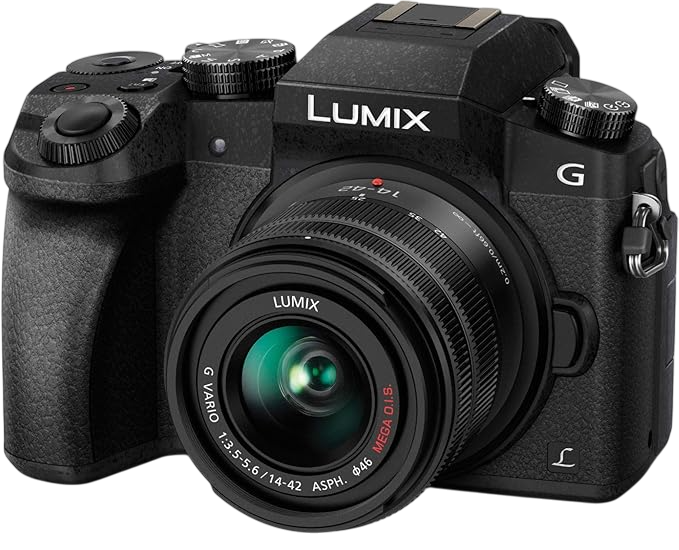
Cameras with good ISO performance, like the Panasonic Lumix G7, save you from having to over-rely on lights.
| Camera Model | Video Quality | Audio Capabilities | Key Features |
|---|---|---|---|
| Sony ZV-1 | 4K Video | Built-in Directional Microphone | Compact Design, Vlogging-Focused Features |
| Canon EOS M50 Mark II | 4K Video | Hot Shoe for External Microphones | Improved Autofocus, Fully Articulating Touchscreen |
| Panasonic LUMIX G7 | 4K Video | Hot Shoe for External Microphones | Excellent Image Quality, Versatile Features |
These best cameras for podcasting meet different needs. Whether you want something small for vlogging or a versatile camera for advanced features, these top podcast cameras are great choices.
Don’t forget external microphone support. Built-in mics on most cameras are terrible. Even the best video quality won’t save bad audio.
The good news is, most DSLRs and webcams allow external mic connections.
Finally, consider your future needs. Rachel knew she’d want to add live streaming later, so we chose a camera compatible with capture cards like the Elgato Cam Link.
If you’re planning for growth, choose gear that can scale with you.
What to Consider in a Video Podcasting Camera
So, Before choosing an option from the best cameras for podcasting, lets nutshell factors you should consider to ensure that you get the best camera for your needs.
Frame rate
The number of individual frames (still photos) it takes in a second is known as its frame rate. Frames per second (FPS) is the unit of measurement for the quantity of frames captured each second. Although some cameras can record at 60 frames per second, most videos are taken at 24 or 30 frames per second.
Make sure your camera can capture at least 30 frames per second, as that is the most popular FPS on YouTube. Although more frames per second is preferable, most viewers are no longer really concerned.
Resolution
The quantity of pixels that a camera can show on a screen is known as its resolution. A clearer image is produced by a higher resolution.
We advise using a camera with a minimum 1920 x 1080 (1080p) high definition resolution for podcasting. This will provide your audience with a clear image of you. Anything less will be viewed as inferior quality these days.
Indeed, a large number of cameras record in 4K and even 8K. Although such produce amazing videos, they can be too much for your purposes. Videos with extremely high quality produce substantially larger files, making them difficult to upload to websites like Vimeo and YouTube.
Your budget
The largest barrier to purchasing equipment for the majority of people is their finances. You probably don’t want to spend a lot of money if you’re a beginner podcaster until your program starts making money. Generally speaking, it makes sensible to begin with a functional piece of equipment and then gradually upgrade to better models.
Decide on a budget and stick to cameras that fit within it. Thankfully, there aren’t many video restrictions for podcasting. Particularly if you intend to position your camera in a single location indoors, you don’t need many bells and whistles. In the end, the cameras that best suit your budget are the greatest for podcasting.
Recording limit
You can only record so much with some cameras. This limit has to do with the inbuilt memory of the camera. Thirty minutes is the industry standard. By connecting the camera to an external storage device, you can get around this restriction, but that will require additional spending.
Make sure the recording limit of the cameras you are considering for your podcast is at least as lengthy as the number of episodes you plan to create. If not, you’ll need to pause and resume recording, then piece everything together before releasing the episode.
Battery
Selecting a camera with a long battery life is crucial if you plan to create lengthy podcast episodes because continuous filming can quickly drain a battery. An alternative is to get a camera that runs when it is plugged in.
Autofocus
You will still be moving about a lot even if you plan to podcast from a desk chair. If you have more than one person on screen, there is much more movement. The best podcasting cameras include autofocus, which can change its focus according to your movements.
Audio quality
You should take this carefully because podcasting obviously depends on high-quality audio. Using a podcasting microphone for your program is highly recommended. A camera’s audio quality is passable, but it’s not nearly as good as a podcasting microphone.
Make sure the microphone on your camera is a top-notch DSLR if you are adamant about using it. Then, to get the greatest audio, go over our guide on microphone techniques.
Image stabilization
Image stabilization is a feature that helps eliminate blurring when the camera itself moves. Even if the camera is positioned in one spot on a tripod or stand, there’s still some movement when a truck drives past or when you shift your feet on the floor. Image stabilization keeps things comfortable for the viewer.
The bottom line?
Choose a camera that matches your goals and budget. If you’re unsure, start simple and upgrade as your podcast grows.
Rachel learned that investing in the right camera early makes a huge difference in both quality and confidence.
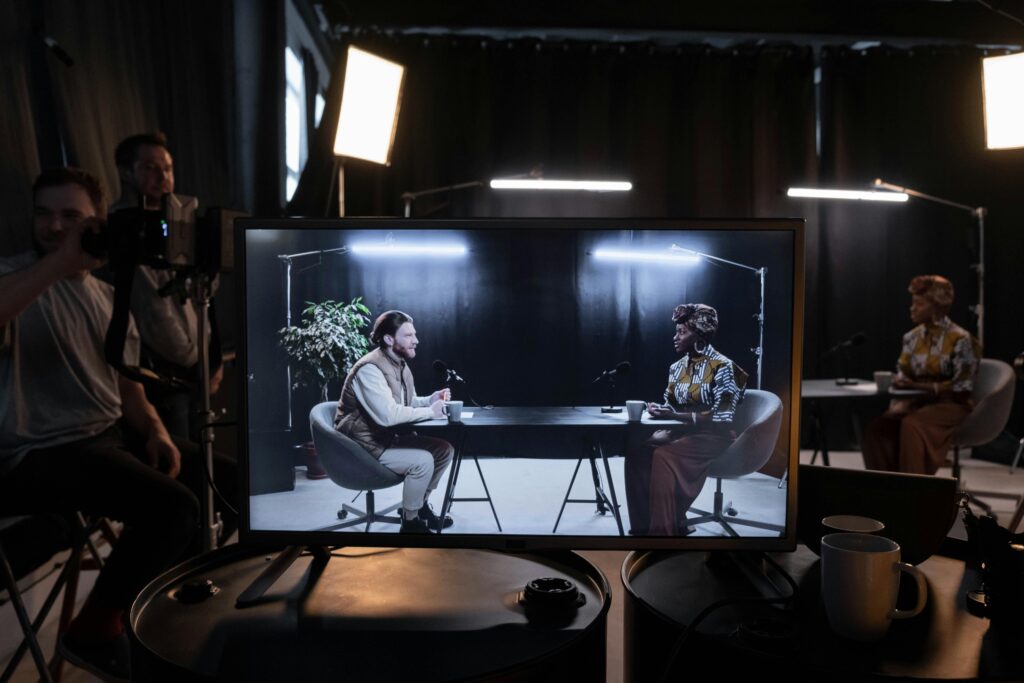
Setting Up Your Podcast Camera
Once you’ve got your podcast camera, setting it up properly is key. A great camera won’t help much if your angle is weird or the lighting is off. When Rachel was setting up her studio, we learned some tricks to make the process simple and effective.
Start with camera placement. The best spot is at eye level. This keeps you looking natural and connected with your audience.
Rachel initially placed her camera too high, which made her look awkward on screen. We fixed it by using an adjustable tripod and centering the frame just right.
Next, adjust your camera settings. For podcasts, 1080p resolution is usually perfect. If you want ultra-crisp video, go for 4K—
Buttt…
remember it takes up more storage.
We set Rachel’s camera to 30fps for smooth motion. Higher frame rates like 60fps are great but can feel unnecessary unless you’re filming something action-packed.
Don’t skip lighting adjustments. A properly lit frame makes your video look professional.
Rachel struggled with uneven lighting at first, so we positioned a ring light directly in front of her.
For a softer, studio-quality look, use a softbox light at a 45-degree angle. This prevents harsh shadows and gives you that natural glow.
Pay attention to your background too. A cluttered or messy backdrop can distract your viewers.
Rachel added a simple bookshelf with a plant and some framed art—it instantly made her setup look polished. If you want flexibility, consider using a green screen to swap out backgrounds later.
Lastly, test everything before you hit record. Rachel learned this the hard way when she recorded an episode with her settings off, and the video looked grainy.
Always check your lighting, focus, and framing!!
Use a remote or app if your camera supports it—many DSLRs and webcams have these features to make adjustments easier.
Getting your setup right takes a bit of trial and error, but it’s worth it. A properly positioned camera with the right settings will make your podcast look professional and keep your audience coming back for more.
Accessories to Enhance Your Podcast Camera Setup
Having the right accessories can take your podcast camera setup from good to amazing.
Here’s what you’ll need to get it right.
First, get a capture card if you’re using a DSLR or mirrorless camera for streaming or recording.
We went with the Elgato Cam Link 4K for Rachel. It’s compact, easy to set up, and ensures crystal-clear video for live streams. Some cameras now have direct USB output, but if yours doesn’t, a capture card is non-negotiable.
An external monitor can be a great, especially if you’re filming alone.
Rachel struggled with framing herself initially, so we added a small Feelworld F6 Plus monitor to her setup. It made it easy to see herself in real-time and avoid wasting time re-recording.
For stability, a good tripod or mount is a must. The Manfrotto Compact Action Tripod is a sturdy, beginner-friendly option.
If you’re tight on space, a desk-mounted arm like the Neewer Camera Mount works perfectly. Rachel swapped her bulky tripod for one of these, and it saved so much room in her small studio.
Don’t forget about lighting accessories. If you’re using softboxes or ring lights, diffusers can make your lighting even softer and more flattering. Rachel added a diffuser to her setup, and the harsh glare on her glasses disappeared instantly.
If you’re using a smartphone as your podcast camera, you’ll need a phone mount. The Ulanzi ST-03 is sturdy, affordable, and can easily attach to any tripod. We used it during Rachel’s early setup days, and it worked like a charm.
Finally, think about cable management. Tangled wires not only look messy but can trip you up during recordings. Simple velcro cable ties or a cable organizer box keeps everything neat and professional-looking. Rachel said this small change made her studio feel way more organized.
Accessories might seem minor, but they’re the secret to a smooth, professional podcast camera setup. Once Rachel added these to her gear, her workflow improved, and her videos looked much more polished.
Podcast Camera Setups for Different Scenarios
Choosing the right podcast camera setup depends on your specific needs. Rachel and I discovered this when she wanted a setup that could handle both solo recordings and occasional guest appearances. Here’s what works best for different cases.
For Solo Podcasters
If you’re recording alone, a compact and easy-to-manage setup is ideal. My freind Obiroi started with the Sony ZV-1, which is small, user-friendly, and has incredible autofocus.
Pair it with a ring light or softbox, and you’re ready to go.
You don’t need multiple cameras here—one high-quality shot is perfect. Add a tripod like the Manfrotto Compact to keep your frame steady.
For Multi-Host Podcasts
With multiple people, you’ll need multi-camera setups or wide-angle lenses.
Rachel upgraded to the Panasonic Lumix G7 for a recent panel discussion. It’s affordable, shoots in 4K, and works well for dynamic angles. A wide-angle lens, like the Sigma 16mm f/1.4, captures everyone without distortion.
If you want multiple cameras, ensure you have a reliable switcher, like the Blackmagic ATEM Mini, to manage live transitions smoothly.
For On-the-Go Podcasts
Portable setups are essential for travel or outdoor recordings. My Friend Wahida uses the GoPro Hero 11 for on-the-go episodes. It’s lightweight, durable, and shoots stunning 4K video.
For better sound, we added a small external mic, the Rode VideoMicro. Pair this with a flexible tripod like the Joby GorillaPod, and you’ve got a mobile setup that’s quick to pack and easy to use.
Matching your camera setup to your scenario ensures you get professional results every time.
If you’re recording solo, hosting guests, or hitting the road, the right gear can make your podcast look polished and consistent. Wahida loved how these setups simplified her workflow and boosted her confidence on camera.
Single-camera vs multi-camera setup
There are generally two types of podcast recording steps:
- Single-camera, which uses one podcast camera to capture a single shot.
- Multi-camera, which uses multiple podcast cameras to record several angles or subjects.
The simplest and most straightforward method is unquestionably a single camera. To begin, you only need to buy one camera, and each episode only requires one shot to be edited.
More variation is possible with multiple cameras, which also increase production value. You can achieve more dynamic images and a higher-quality final result by investing in numerous cameras and navigating more intricate editing procedures.
The good news is, you don’t need to manage the recording/editing process alone.
Successful Entrepreneurs and Creators always outsource those jobs that consume their time, so that they can focus on their real job without any distractions and headaches.
Moreover, professionals usually do it better, that would have been much worse if you had decided to do it all by yourself because of your lack of expertise in those fields.
We have already filtered out the High Quality online freelancers of Fiverr Get Connected with them by visiting soundorp.com/services today to make your podcasting Journey easier than ever.
Common Mistakes to Avoid in a Podcast Camera Setup
Poor Lighting Ruins Everything
Even a high-end camera looks bad in poor lighting. Rachel tried filming with just natural light, but clouds ruined her consistency. Adding a ring light and softbox fixed it instantly. Don’t rely on overhead lights—they create harsh shadows that are hard to fix in editing.
Incorrect Camera Angles
Placing your camera too high or low can make you look awkward. Always keep the camera at eye level. Rachel learned this after filming a whole episode with the camera angled too high, which made her look distant and stiff.
Using the Wrong Camera Settings
Many people shoot in automatic mode and end up with poor results. Switch to manual or semi-manual modes if you can. Rachel struggled with grainy footage until we adjusted her camera’s ISO and white balance. For podcasts, stick with 1080p at 30fps unless you need 4K.
Skipping a Tripod
Handheld or unstable shots don’t work for podcasts. Rachel once balanced her camera on books, and it fell mid-recording. A simple tripod or desk mount solves this completely.
Background Clutter Distracts Viewers
A messy or busy background pulls focus away from you. Rachel’s backdrop was a plain wall at first, but adding a bookshelf and plant made her setup look more professional. If you can’t style your background, consider a green screen.
Ignoring Audio Quality
Even though this is about cameras, viewers care just as much about how you sound. Use an external microphone, even if it’s a simple lav mic. Built-in camera mics don’t cut it, no matter how expensive your camera is.
Avoiding these mistakes ensures your podcast camera setup looks and feels professional. Rachel’s experience proves that small adjustments can have a big impact on how your audience perceives your content.
Tips to Keep Your Podcast Camera Setup Professional
Keeping your podcast camera setup professional doesn’t have to be complicated. It’s about fine-tuning the little details that make your videos stand out. When Rachel finalized her setup, she realized that consistent tweaks improved her content massively.
Maintain Consistent Lighting
Always keep your lighting consistent across episodes. Rachel used natural light at first, but cloudy days ruined her look. We switched to softbox lights, and the problem disappeared. If you move locations often, portable LED lights like the Aputure MC are a lifesaver.
Check Your Camera Settings Before Recording
It’s easy to forget your camera settings, but small changes can affect quality. One of my client once filmed an episode with the wrong ISO, and the video turned out grainy. Make it a habit to double-check resolution, frame rate, and focus before every session.
Keep Your Lens Clean
A dirty lens can ruin even the best cameras. Rachel’s first videos had blurry spots because of smudges. A quick wipe with a microfiber cloth before recording keeps your footage sharp.
Use a Backup Power Source
Nothing is worse than your camera dying mid-recording. My client Nelson learned this during a long interview, and it was a nightmare. A dummy battery or an external power bank ensures your camera stays on, no matter how long you’re recording.
Test Your Setup Before Going Live
Whether you’re streaming or recording, test your entire setup first. Rachel missed this step once, and her mic wasn’t connected properly. Run a quick trial to check lighting, audio, and framing. This extra step saves you from embarrassing mistakes.
Keep Your Studio Organized
A clutter-free setup looks more professional. Rachel started using cable organizers and a compact gear shelf, and it made her space feel studio-ready. It’s not just about looks—it keeps your workflow smoother too.
A professional setup doesn’t happen overnight, but with these tips, you’ll nail it. Rachel’s experience proves that small adjustments build confidence and improve how your audience views your content.
Conclusion
Building the perfect podcast camera setup doesn’t have to be overwhelming. It’s about knowing your needs, picking gear that works for your style, and avoiding common mistakes. Rachel learned this while setting up her podcast. By focusing on essentials like good lighting, a reliable tripod, and a camera that fits her goals, she created a setup that looked professional without breaking the bank.
Remember, your podcast setup isn’t just about gear; it’s about how your audience connects with your content. With the right tools and mindset, you’ll look and feel confident in every episode. If Rachel can do it, so can you.
Podcasting is a different game, and without a precise blueprint, the game will get tougher midway. Grow your podcast from scratch with Zero Audience and learn about how successful podcasters cracked the code by winning our Free Guide with step by step Guidelines.
Get your complete podcast equipment setup by visiting Podcast Equipment Bundle. Don’t let the side projects kill your time. Get in touch with podcasting services and experts those will save you tons of time at Podcast Production Services.
With that being said, Let’s connect with all such free and paid tool/services you might need knowingly or unknowingly to fuel your growth. Here’s 21 BEST AI TOOLS AND PLATFORMS TO GROW YOUR PODCAST AND CONTENTS. There are some bonus tools in the end too to make your day to day life easier.
There are some affiliate links on this page that will redirect you directly to the original products and services. Also by buying through those links you will be supporting us. So thank you ^.^