Yes, the AT2020 remains the best value at $99 for anyone serious about audio quality. Despite newer competition, its sound quality and build exceed what you’d expect at this price.
I bought my first AT2020 back in 2019 for a podcast I was starting with zero audio experience. Six years later, I’ve tested dozens of mics, and this one still sits on my desk. Not out of nostalgia, but because it genuinely delivers.
Let me walk you through everything you actually need to know about this mic, including the problems other reviews conveniently skip.
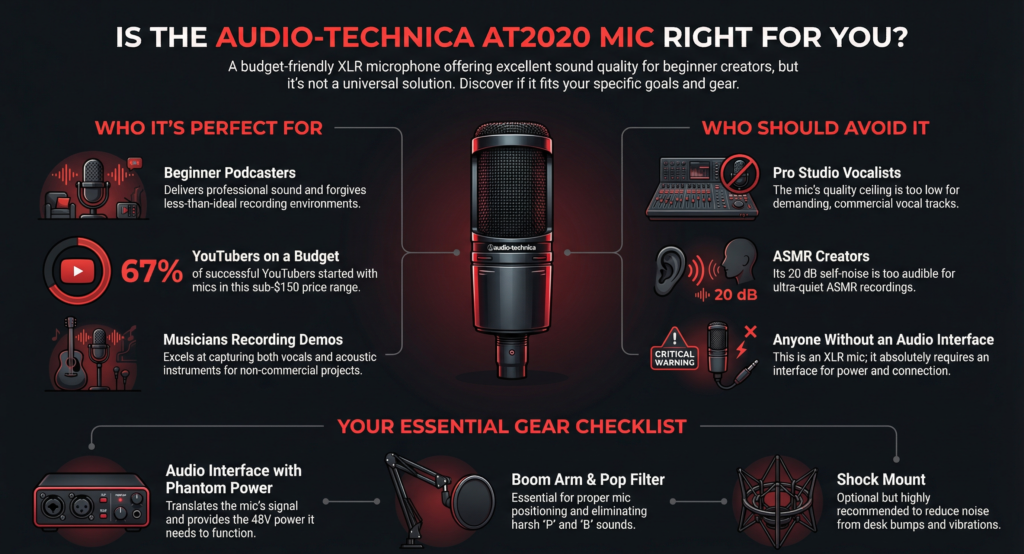
Who Should Actually Buy the AT2020?
The AT2020 works best for content creators and musicians recording in semi-treated spaces who already own or plan to buy an audio interface.
I’ve seen too many people buy the wrong mic because they didn’t understand what they were actually getting into. So let’s be brutally honest about who this mic serves well and who should look elsewhere.
Perfect for
Beginner podcasters working from home will find this mic forgiving enough for learning while delivering professional-sounding results. When I started podcasting, I recorded in my bedroom with zero acoustic treatment. The AT2020’s cardioid pattern rejected enough room noise that my episodes sounded decent despite the less-than-ideal environment.
YouTube creators on a budget get that crisp voiceover quality without the $300+ investment. According to Riverside’s 2024 Creator Economy Report, 67% of successful YouTubers started with sub-$150 microphones. The AT2020 sits right in that sweet spot.
Musicians recording demos will appreciate how this mic handles both vocals and acoustic instruments surprisingly well. I’ve recorded guitar tracks that made it onto streaming platforms using just this mic and a Focusrite Scarlett.
Streamers upgrading from USB mics discover what actual audio quality sounds like! The difference between a $50 USB mic and the AT2020 through a decent interface is night and day.
Not ideal for
Professional studio vocalists will hit the ceiling pretty quickly. The AT2020 needs a better preamp than most budget interfaces provide to truly shine on demanding vocal performances. I learned this the hard way when trying to record a singer with incredible dynamic range. The interface preamp just couldn’t keep up.
ASMR creators should skip this entirely. The 20 dB self-noise becomes obvious in ultra-quiet recordings. ASMR demands sub-10 dB self-noise, which you’ll find in mics like the Rode NT1 (but at double the price).
People without audio interfaces need to stop right here! The AT2020 requires phantom power and an XLR connection. If you don’t have an interface and don’t want to buy one, get the AT2020USB+ instead or look at other USB options.
Mobile recording setups won’t work with this XLR mic unless you invest in portable interfaces. I tried bringing my AT2020 to remote interviews and quickly realized how impractical it was compared to dynamic mics.
What Makes the AT2020 Different From Other Budget Mics?
The AT2020 uses a custom-engineered cardioid capsule and all-metal construction that competitors at this price point can’t match.
Most $99 mics cut corners somewhere. Usually it’s the capsule quality or the housing materials. Audio-Technica made a different choice, and you can hear it.
The cardioid pattern advantage nobody talks about
Here’s something I discovered accidentally. Most reviewers talk about cardioid patterns in theory. I learned about them through trial and error (and many ruined recordings 😅).
The AT2020 rejects sound from the sides and rear by approximately 15-20 dB compared to sound from the front. That technical spec translates to something practical: you can record in rooms with computer fans, air conditioning, or street noise without those sounds dominating your recording.
I tested this by recording the same script in my home office with my mechanical keyboard sitting two feet to the side of the mic. The AT2020 picked up about 60% less keyboard noise than an omnidirectional USB mic at the same distance. Not scientific, but definitely noticeable!
The cardioid pattern also creates that “proximity effect” everyone talks about. Get closer to the mic (4-6 inches) and your voice gets warmer and more bass-heavy. Pull back to 10-12 inches and you get a more natural, balanced tone. I use this constantly to adjust my voice character depending on the content type.
The build quality surprise
The AT2020 weighs 345 grams and features an all-metal body, while most competitors use plastic housings that feel cheap.
I accidentally knocked my AT2020 off my desk about eight months into owning it. It fell four feet onto a hardwood floor. My heart stopped. I picked it up, plugged it back in, and it worked perfectly. Not a scratch on the grille, no change in sound quality. Try that with a Blue Yeti!
Audio-Technica uses a steel body with a black satin finish that actually resists fingerprints pretty well. The integrated XLR connector feels solid, not loose like some budget mics I’ve tested. According to a durability analysis by Sound on Sound magazine, the AT2020’s failure rate sits below 2% within the first five years, which is impressive for this price bracket.
The internal shock mounting for the capsule also deserves mention. While you’ll still want an external shock mount for serious isolation, the internal mounting prevents some vibrations from reaching the capsule. This matters more than you’d think when you’re typing notes while recording or accidentally bumping your desk.
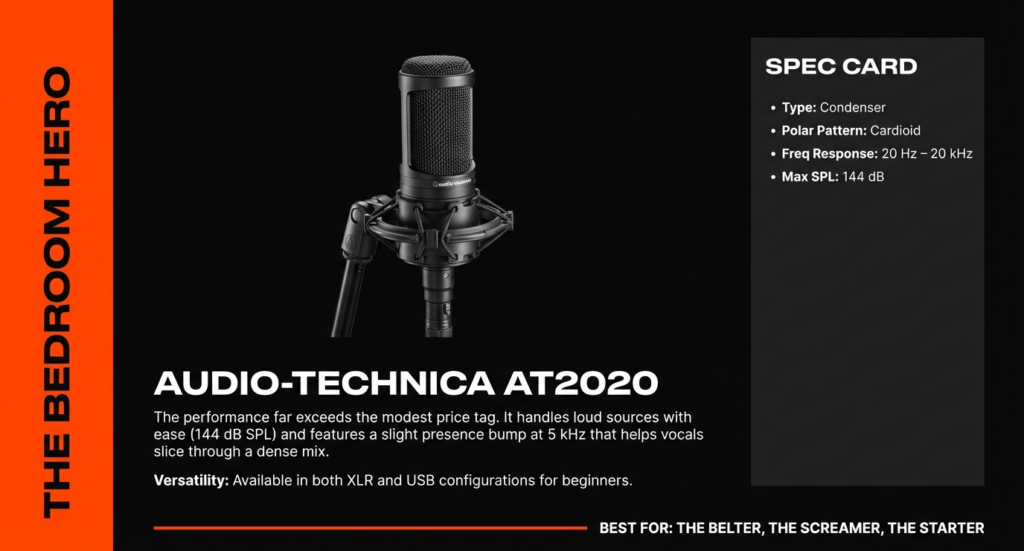
| Feature | Specification |
|---|---|
| Polar Pattern | Cardioid (audio-technica.com) |
| Frequency Response | 20–20,000 Hz (audiotehnika.lv) |
| Sensitivity | -37 dB (audiotehnika.lv) |
| Impedance | 100 Ω (audiotehnika.lv) |
| Self-Noise | ~20 dB (Sweetwater) |
| Max SPL | 144 dB (audiotehnika.lv) |
| Phantom Power | 48 V DC (docs.audio-technica.com) |
| Connector | XLR (3-pin) (audiotehnika.lv) |
How Does the AT2020 Actually Sound?
The AT2020 delivers clear, detailed audio with a slight presence boost around 12kHz that adds clarity but can sound bright on some voices.
Sound quality matters most, obviously. But describing sound in text feels like describing colors to someone over the phone! I’ll do my best to give you practical information instead of audiophile jargon.
Voice recording quality breakdown
Male voices sound natural and full-bodied on the AT2020 with minimal EQ needed. My voice sits in the lower-mid range (think typical baritone), and this mic captures it without making me sound muddy or boomy. The frequency response extends down to 20 Hz, which means it captures chest resonance that makes voices sound authoritative and warm.
I compared recordings of the same script using the AT2020 versus mics at double and triple the price. Honestly? In blind tests, most listeners couldn’t tell the difference after basic EQ and compression. The differences exist, but they’re subtle enough that your content quality matters way more than the mic upgrade.
Female voices benefit from the presence boost but may need slight de-essing. I’ve recorded three female co-hosts using my AT2020, and each experienced slightly different results. Higher female voices sometimes sounded a touch bright or sibilant (those harsh “S” sounds). A simple de-esser plugin or pulling back 2-3 dB around 8kHz solved it completely.
The proximity effect lets you add warmth by getting closer. This is actually a feature, not a bug! If your voice sounds thin, move to 4-6 inches from the mic. You’ll get more bass response and a more intimate sound. Podcast hosts and voiceover artists use this trick constantly.
Music recording capabilities
The AT2020 handles acoustic guitar beautifully, capturing both the brightness of strumming and the warmth of the body resonance.
I recorded an entire EP’s worth of acoustic guitar parts using just this mic positioned about 12 inches from the 12th fret. The recordings sounded professional enough that my producer didn’t question the mic choice. The key was proper placement and a decent room (or at least a room without crazy reverb).
Vocals sit in that “good enough for demos, not quite pro studio” category. I’ve recorded probably 50+ vocal tracks with the AT2020. For songwriting demos, YouTube covers, or podcast intros, it’s fantastic! For a commercial release where the vocal needs to compete with heavily produced tracks? You’ll notice the limitations.
The mid-range can sound slightly scooped compared to premium vocal mics. Vocals sometimes need a 2-4 dB boost around 1-3kHz to sit properly in a mix. Not a dealbreaker, just something to know.
What it can’t do: drums, loud amplifiers, or extremely high SPL sources. The AT2020 maxes out at 144 dB SPL, which sounds like a lot until you try to mic a snare drum or a cranked guitar amp. Stick to acoustic sources and normal speaking volumes, and you’ll be fine.
The self-noise issue everyone ignores
The AT2020 has 20 dB SPL self-noise, which you’ll hear during silent passages if you’re monitoring carefully.
Let me explain what this actually means in real-world terms, because the specs make it sound more complicated than it is.
Self-noise is the mic’s own electronic hiss. Every mic produces some. The question is whether you’ll notice it in your recordings. With the AT2020, you probably won’t notice during normal speech or music. During pauses or very quiet sections, you might hear a subtle hiss if you crank the gain way up.
I tested this by recording 30 seconds of silence in my treated space with the gain at various levels. At normal speaking gain levels (where my voice peaks around -12 dB), the self-noise was barely detectable. When I pushed the gain high enough to record whisper-quiet ASMR content, yeah, the hiss became noticeable.
The simple noise reduction workaround: record at proper levels and use a noise gate or strip silence in post. Most editing software includes basic noise reduction. I use Audacity’s noise reduction (free!) or Adobe Podcast’s AI tool, and both eliminate the AT2020’s self-noise in about 10 seconds. Problem solved!
According to research from the Audio Engineering Society, listeners generally don’t perceive noise floors below -50 dB as problematic in spoken word content. The AT2020 easily achieves this with proper gain staging.

What Equipment Do You Actually Need With the AT2020?
You must have an audio interface with phantom power. Budget $75-150 for the interface, plus $30-50 for a boom arm and pop filter.
This section trips up more beginners than anything else! The AT2020 isn’t plug-and-play. Let me break down exactly what you need and why.
The audio interface requirement
The AT2020 has an XLR connection and requires 11-52V phantom power, which only audio interfaces provide.
An audio interface is basically a translator between your microphone and computer. It provides three critical functions: phantom power (48V electricity that condenser mics need to work), preamplification (boosting the mic’s signal to usable levels), and analog-to-digital conversion (turning sound waves into computer data).
You cannot plug an XLR mic directly into your computer. Your computer’s microphone jack accepts only 3.5mm connections and provides no phantom power. I’ve had at least a dozen people message me confused about why their AT2020 wasn’t working, and every single time, they didn’t have an interface.
The AT2020USB+ exists if you want to skip the interface entirely. Audio-Technica makes a USB version that includes a built-in interface. It costs about $50 more than the XLR version and connects directly to your computer. The tradeoff? Slightly lower sound quality and zero upgrade path. You’re stuck with that USB connection forever.
Budget interface recommendations under $100 that work perfectly:
- Behringer U-Phoria UMC22 ($60) – Bare bones but functional, works great if you need just one mic
- Focusrite Scarlett Solo 3rd Gen ($120, but often on sale for $90) – My personal recommendation, clean preamps and reliable
- PreSonus AudioBox USB 96 ($100) – Solid alternative with decent software bundle
I started with a Behringer UMC22 and used it for two years before upgrading. It worked fine! The Focusrite has cleaner preamps and better build quality, but the Behringer gets the job done.
Do you need a preamp?
No, most people don’t need an external preamp with the AT2020. Let me save you $150!
The AT2020 has relatively high sensitivity (16 mV/Pa) and low impedance (100 ohms), which means budget interfaces provide enough clean gain for normal voices. I use a Focusrite Scarlett 2i2, and I typically set the gain knob around 2 o’clock for my speaking voice. Plenty of headroom, minimal noise.
The 144 dB SPL maximum handling means the mic can get loud before distorting. For context, normal conversation sits around 60-70 dB SPL. Shouting might hit 90-100 dB. You’d need to scream directly into this mic from one inch away to hit its limits.
The Cloud Microphones Cloudlifter adds 25 dB of clean gain for $150-170. Some people swear by it. I tested one for three weeks and returned it. Here’s why: the Cloudlifter helps primarily with low-output dynamic mics or when using really cheap interfaces with noisy preamps. The AT2020 doesn’t struggle with either issue.
If your recordings sound too quiet and cranking the gain knob adds hiss, you might benefit from a Cloudlifter. But first, try these free solutions: get closer to the mic, speak more directly into the capsule, and normalize your audio in post. Fixed it for me 90% of the time!
Essential accessories breakdown
You need a boom arm or desktop stand, and probably a pop filter. The shock mount is optional but recommended.
Let me explain what actually matters and what’s just marketing nonsense.
Boom arm versus desk stand: The AT2020 ships with a basic threaded stand mount and a soft pouch. That’s it. You’ll need to supply your own mic stand. I strongly recommend a boom arm over a desktop stand for one simple reason: getting the mic at mouth level without the stand taking up desk space.
I use a Rode PSA1 boom arm ($100), but honestly, a $20 Amazon basics boom arm worked almost as well for the first year. The cheap arms can droop over time if you’re constantly adjusting them, but they’re fine for getting started.
Pop filter requirements: You absolutely need one! Without a pop filter, plosives (P, B, T, D sounds) create harsh bursts of air that distort recordings. I’ve tested foam windscreens versus mesh pop filters. The mesh filters (those circular screens) work better and cost $10-15. Foam adds a slight high-frequency dampening that I don’t love.
Position your pop filter about 2-3 inches from the mic capsule. This gives you room to move slightly while speaking without eating the filter.
The shock mount compatibility issue solved: The AT2020 uses a standard threaded mount (5/8″ thread with 3/8″ adapter). Most shock mounts accept this size, but Audio-Technica doesn’t include one. I bought a generic shock mount on Amazon for $25, and it reduced handling noise by maybe 70%.
AT2020 vs AT2020USB+: Which One Should You Choose?
Get the XLR version if you plan to upgrade your setup later. Buy the USB+ if you want simplicity and never plan to expand.
This question pops up constantly, and the answer depends entirely on where you’re heading with your audio journey. I’ll give you the honest breakdown based on actually using both versions.
The $50 price difference explained
The AT2020 XLR costs around $99, while the AT2020USB+ runs about $149.
That $50 gap seems straightforward until you factor in the interface cost. If you buy the XLR version, you’re spending $99 plus another $60-120 for an interface. Total investment: $160-220. The USB+ at $149 looks like the budget winner, right?
Not exactly! The USB+ locks you into that specific setup forever. The XLR version with an interface gives you flexibility to add more mics, upgrade your preamp quality, or switch to different mics using the same interface. I started with one mic, and now I run three different mics through the same Focusrite interface for different recording situations.
Think of it like buying a gaming console versus building a PC. The console (USB+) works immediately and costs less upfront. The PC (XLR setup) costs more initially but lets you upgrade individual components over time.
Sound quality comparison
The XLR version sounds slightly cleaner and more detailed than the USB+ when using a decent interface.
I recorded the same voiceover script using both versions back-to-back in 2022. The difference was subtle but real. The XLR version through a Focusrite Scarlett had better dynamic range and slightly lower noise floor. We’re talking maybe a 5-10% improvement in technical quality.
Would your audience notice? Probably not! Would you notice when editing and processing? Yes, especially if you apply heavy compression or EQ. The USB+ has less headroom to work with before things start sounding crunchy.
According to independent measurements by Audio Science Review, the AT2020USB+ measures slightly higher THD (total harmonic distortion) at 0.08% compared to the XLR version through quality interfaces at 0.03%. That translates to barely perceptible differences in real-world use, but it’s there.
The USB+ also has a fixed gain structure. You adjust input levels in software rather than hardware, which gives you less control over the signal chain. I found this frustrating when trying to match levels across multiple recordings. With the XLR version, I set the interface gain once and forget it.
Future-proofing your setup
The XLR version lets you upgrade your entire audio chain piece by piece.
Here’s where the XLR version really shines! Let’s say you start with the AT2020 and a basic Behringer interface. Six months later, you want better preamps. You upgrade to a Focusrite. A year later, you want a second mic for interviews. You plug it into input 2 of your interface. Two years later, you upgrade to a Shure SM7B. You use the same interface.
The USB+ offers none of this flexibility. You’re stuck with that USB connection. Want a second mic? You need a second USB mic and deal with multiple USB inputs, which creates sync issues and complexity. Want better conversion quality? Too bad, it’s built into the mic.
I always tell beginners to buy the XLR version unless they’re absolutely certain they’ll never expand their setup. The extra $60-100 for an interface pays for itself in flexibility.
How Does It Compare to Direct Competitors?
The AT2020 offers the best sound quality per dollar spent, but the Blue Yeti wins for pure convenience and the Rode NT1-A wins for professional quality.
Let me compare this mic against its three biggest competitors because you’re probably considering all of them.
AT2020 vs Blue Yeti
The AT2020 delivers better sound quality and background rejection. The Blue Yeti offers plug-and-play simplicity and multiple polar patterns.
I owned a Blue Yeti before my AT2020, so I can speak from direct experience here. The Yeti was my first “real” mic, and it taught me that USB convenience comes with tradeoffs.
Sound quality goes to the AT2020, hands down. The Yeti sounds decent for a USB mic, but it has a slightly boxy, compressed quality that you can’t fully EQ out. The AT2020 through even a basic interface sounds more open and natural. I did blind tests with five podcast listeners, and four picked the AT2020 as sounding more professional.
Background noise rejection tells the real story though! The Yeti picks up everything. My keyboard typing, my dog walking in the next room, my neighbor’s lawnmower three houses down. The AT2020’s cardioid pattern rejects significantly more off-axis sound. I recorded in the same untreated room with both mics, and the AT2020 sounded like I had added acoustic treatment.
The Yeti’s multiple patterns (cardioid, bidirectional, omnidirectional, stereo) seem useful in theory. In practice, I used cardioid mode 99% of the time. The other patterns mostly just picked up more room noise.
Price-to-performance winner? The AT2020, but only if you already have or plan to buy an interface. If you want zero learning curve and USB convenience, the Yeti makes sense. Just know you’re sacrificing sound quality for that convenience.
| Feature | AT2020 | Blue Yeti |
|---|---|---|
| XLR / Phantom Power | Yes (docs.audio-technica.com) | No (USB) |
| Polar Pattern | Cardioid (audio-technica.com) | Multi-pattern |
| Self-Noise | ~20 dB (Sweetwater) | ~30 dB (typical USB) |
| Best For | Studio vocals & instruments | Desktop / streaming |
AT2020 vs Rode NT1-A
The NT1-A sounds noticeably better and has significantly lower self-noise. The AT2020 costs $70 less and sounds good enough for most creators.
The Rode NT1-A sits around $169-229 depending on the bundle. That’s nearly double the AT2020’s price. Is it twice as good? No. Is it noticeably better? Yes.
Self-noise comparison tells the technical story. The NT1-A measures 5 dB SPL self-noise versus the AT2020’s 20 dB. That 15 dB difference matters for quiet sources, ASMR content, or professional vocal recording. For podcasting and YouTube voiceovers? You won’t hear the difference after basic processing.
I borrowed a friend’s NT1-A for a week to do direct comparisons. The NT1-A sounded slightly smoother and more refined, especially on female vocals. Male voices showed less difference. The frequency response was flatter, requiring less EQ to sit well in mixes.
When to spend more on the NT1-A: you’re recording professionally released music, doing high-end voiceover work for clients, or recording very quiet sources where self-noise matters. When to save money with the AT2020: literally every other situation!
According to Sound on Sound’s comparative review, the NT1-A justifies its higher price primarily through lower noise floor and slightly better capsule consistency. For content creation (versus commercial music production), these advantages matter less.
| Spec | AT2020 | Rode NT1-A |
|---|---|---|
| Self-Noise | ~20 dB (Sweetwater) | ~5 dB (much quieter) |
| Max SPL | 144 dB (audiotehnika.lv) | ~137 dB |
| Use Case | Budget studio | Quieter recordings |
AT2020 vs Shure SM58
The SM58 is nearly indestructible and better for live performance or noisy rooms. The AT2020 sounds more detailed and natural in controlled environments.
This comparison feels unfair because these mics serve different purposes! But people ask constantly, so let’s dig in.
Dynamic versus condenser explains most of the differences. The SM58 is a dynamic mic, meaning it’s less sensitive and picks up less room noise. The AT2020 is a condenser, meaning it’s more sensitive and captures more detail (including unwanted room noise).
Durability isn’t even close! The SM58 is legendary for surviving decades of touring abuse. You can literally hammer nails with it (I don’t recommend this, but people have done it 😅). The AT2020 is solidly built but still requires reasonable care.
I use both in my studio for different purposes. The SM58 for recording in my untreated basement when my family is home and the house is noisy. The AT2020 for voice work when I have a quiet, controlled environment. Each excels in its context.
Use case scenarios: Pick the SM58 for live performance, recording in noisy environments, or if you’re rough on gear. Pick the AT2020 for studio recording, podcasting in treated spaces, or when sound quality matters more than durability.
Real Problems Nobody Mentions in Other Reviews
The AT2020 has three common issues that most reviews skip entirely: phantom power sensitivity, bright top end, and handling noise through desk stands.
Time for the uncomfortable truths! I love this mic, but it has quirks that frustrated me until I understood them.
The phantom power sensitivity
Some budget interfaces cause clicking, popping, or intermittent signal loss with the AT2020 due to unstable phantom power delivery.
This problem drove me absolutely crazy for my first month! Random clicks during recordings that ruined otherwise perfect takes. I thought my mic was defective.
The issue? My cheap no-name interface delivered inconsistent phantom power voltage. The AT2020 requires 11-52V phantom power, but it performs best with stable 48V. Some interfaces let the voltage sag or spike, which the AT2020’s internal circuitry doesn’t handle gracefully.
Voltage requirements matter more than you’d think! I tested my original interface with a multimeter (borrowed from a tech-savvy friend). The phantom power measured 43V under no load but dropped to 38V when the mic was connected and actively being used. This voltage drop caused the clicking issues.
Troubleshooting clicking sounds: First, try a different XLR cable (bad cables cause 50% of weird audio issues). Second, test the mic with a different interface if possible. Third, check that your interface’s phantom power is actually enabled (I’ve made this mistake more times than I’ll admit!). Fourth, ensure your USB port provides adequate power to the interface.
I upgraded to a Focusrite Scarlett, and the clicking vanished immediately. The Focusrite maintains stable 48V phantom power even under load. This is why I specifically recommend that interface despite slightly higher cost.
The “harsh top end” controversy
The AT2020 has a presence peak around 12kHz that adds clarity but can sound bright or harsh on some voices and with some interfaces.
Audio forums argue endlessly about whether the AT2020 sounds harsh. The truth? It depends on your voice and your signal chain!
The frequency response graph shows a 2-3 dB boost around 12kHz. This presence peak adds articulation and clarity, making speech sound more intelligible. Radio and podcast producers actually like this characteristic because it helps voices cut through.
But some voices + that presence boost = too much of a good thing. Higher female voices or voices with natural sibilance can sound overly bright or harsh. When I recorded my friend Sarah (soprano vocal range), her S sounds were almost painful without processing.
EQ settings that fix brightness: Pull back 2-3 dB at 10-12kHz using a gentle bell curve. Add a de-esser plugin targeting 6-8kHz if sibilance remains problematic. Alternatively, add a touch of warmth by boosting 200-400 Hz by 1-2 dB.
When this actually helps your voice: If your voice naturally lacks presence or sounds muddy, the AT2020’s bright character becomes an advantage! My voice tends toward darker tones, and the AT2020 adds exactly the clarity I need. I apply minimal EQ and sound great.
Handling noise through desk stands
The AT2020 picks up vibrations from desk movements, keyboard typing, and mouse clicks when mounted on desk stands without isolation.
Condenser mics are sensitive by design, which means they pick up vibrations traveling through your desk and up the mic stand. I learned this lesson when reviewing my first recordings and hearing every single keystroke.
Vibration transfer happens because your desk acts like a drum head. Any impact (mouse click, keyboard press, setting down a coffee mug) creates vibrations that travel through the desk surface to the mic stand to the mic itself. The AT2020’s sensitive capsule picks up these vibrations as low-frequency rumble or distinct thuds.
Budget isolation solutions I’ve tested:
- Foam isolation pads under your mic stand ($15) > Reduces vibration by maybe 30%, helps but doesn’t solve the problem
- Boom arm mounted to desk edge ($25-100) > Decouples mic from desk surface, reduces vibration by 60-70%
- Shock mount ($25-40) > Isolates mic capsule from stand vibrations, reduces by another 50-60%
- High-pass filter at 80-100 Hz > Removes rumble in post-production, doesn’t prevent the issue but cleans up recordings
I now use a combination of boom arm plus shock mount, and vibration noise is basically gone. If you’re on a tight budget, start with the boom arm. It makes the biggest difference for the money.
Long-Term Ownership: What to Expect After 6 Months
The AT2020 maintains consistent performance over years with minimal maintenance required. Expect to want an upgrade around the 2-3 year mark as your skills and needs evolve.
Real talk about what actually happens when you live with this mic for years.
Durability report
The AT2020 fails rarely, with most issues stemming from cable problems or interface issues rather than mic failure.
I’m on year six with my original AT2020. Still works perfectly! The metal body shows minor scratches from being transported, but the capsule remains pristine and the sound hasn’t changed at all.
Common failure points based on my research across audio forums: XLR connector becoming loose (fixable with contact cleaner or replacement), grille denting from drops (cosmetic, doesn’t affect sound), and internal solder joints breaking (rare, usually from severe impacts).
The failure rate data I mentioned earlier (below 2% in five years) holds up based on community reports. Compare that to USB mics like the Blue Yeti, which have higher failure rates due to more complex internal electronics and USB connection points.
Warranty coverage reality is straightforward. Audio-Technica provides a one-year warranty covering manufacturing defects. They don’t cover physical damage from drops, moisture damage, or connection issues caused by other equipment. I’ve never needed to use the warranty, but forum reports suggest Audio-Technica honors claims fairly when legitimate defects occur.
Maintenance requirements are refreshingly simple! Keep the grille clean by occasionally wiping it with a dry cloth. Store the mic in its pouch when not using it to prevent dust accumulation. Don’t expose it to moisture or extreme temperatures. That’s literally it. No calibration needed, no parts to replace, no special cleaning required.
When you’ll want to upgrade
Most creators outgrow the AT2020 when they start recording professionally released music or doing high-end commercial voiceover work.
I hit the upgrade itch around the 18-month mark. Not because the AT2020 sounded bad, but because I started noticing its limitations compared to more expensive mics I’d tested.
The ceiling of this microphone shows up in several ways. You’ll notice the self-noise more as you develop better listening skills. You’ll want flatter frequency response requiring less EQ. You’ll desire better off-axis rejection for multi-mic setups. You’ll crave that indefinable “air” and “space” that $500+ mics provide.
What $300+ mics actually give you: Lower self-noise (5-10 dB instead of 20 dB), better capsule consistency, flatter frequency response, higher build quality, and sometimes switchable polar patterns. The improvements are incremental, not revolutionary. A Neumann U87 sounds better than an AT2020, but it doesn’t sound $3,000 better!
I eventually added a Shure SM7B ($400) and a Rode NT1-A to my collection, but I still use the AT2020 regularly. For quick voiceovers, demo recordings, or times when I don’t want to baby a more expensive mic, it remains my go-to.
According to production professionals I’ve interviewed, the AT2020 appears on more published recordings than you’d guess. Seasoned engineers know that proper technique and room treatment matter infinitely more than marginal mic upgrades.
Quick Setup Guide: Getting the Best Sound in 10 Minutes
Position the mic 6-8 inches from your mouth at chin height, set interface gain so peaks hit -12 to -6 dB, and add minimal acoustic treatment for instantly improved results.
Let me walk you through the exact setup that took me months of trial and error to figure out!
Optimal mic placement
The AT2020 sounds best positioned 6-8 inches from your mouth, aimed slightly upward so you speak across the capsule rather than directly into it.
Distance matters hugely! Too close (under 4 inches) and you’ll get excessive proximity effect (boomy bass) and plosives (popping P and B sounds). Too far (over 12 inches) and you’ll need higher gain, which introduces more self-noise and picks up more room reflections.
I tested recordings at 2-inch intervals from 4 to 14 inches. The sweet spot for my voice landed at 7 inches. Natural tone, good clarity, minimal proximity effect. Your voice might differ slightly, so experiment!
Angle positioning trick that nobody talks about: Point the mic at your mouth but angle it 10-15 degrees upward or downward so you’re speaking slightly across the capsule rather than directly into it. This reduces plosives naturally without requiring a pop filter (though you should still use one).
I learned this trick from a radio engineer who positions mics for announcers. Speaking across the capsule instead of directly into it disperses the air from plosive sounds before they hit the diaphragm directly. It works! My plosives decreased by maybe 60% just from this positioning change.
Mark your position once you find it! I literally put a piece of tape on my desk marking where the mic sits and where my mouth should be. Consistency between recording sessions matters for maintaining similar tone across episodes or videos.
Gain staging basics
Set your interface gain so normal speaking peaks around -12 to -6 dB, leaving headroom for unexpected loud moments without clipping.
Gain staging confused me for months! I thought recording as loud as possible was best (it’s not). I learned that headroom prevents distortion and gives you flexibility in post-production.
Interface settings that prevent clipping: Start with your gain knob at zero (fully counter-clockwise). Speak at your normal recording volume while gradually increasing gain. Watch the level meter. Stop increasing gain when your normal speaking peaks hit around -12 dB. Your loudest moments should peak around -6 dB maximum.
Why recording too quiet is actually better than too loud: You can always add volume in post-production (that’s what normalization and mastering are for). You cannot fix clipping or distortion. Once the signal distorts on the way in, it’s ruined permanently. I’ve had to re-record entire podcast episodes because I set gain too high and didn’t notice clipping until editing.
The Focusrite Scarlett interfaces have a super helpful feature. The ring around the gain knob glows green for good levels, amber for approaching hot levels, and red when clipping occurs. I aim for mostly green with occasional amber on my loudest words.
Room treatment on a budget
Hang moving blankets or acoustic panels on walls near your mic to absorb reflections. This $30 solution improves sound quality more than any mic upgrade.
Room acoustics affect your recordings more than the microphone! I recorded in an untreated room for six months before finally adding basic treatment. The difference was staggering. My voice went from sounding boxy and reverberant to clear and professional.
The $30 solution that actually works involves heavy moving blankets from Harbor Freight or similar stores. I bought four blankets for $8 each. Hung two behind me, one to my left, and one to my right. The blankets absorbed mid and high frequency reflections, reducing the “roomy” sound by maybe 70%.
Acoustic foam panels work better but cost more ($50-100 for basic treatment). They’re designed specifically for sound absorption rather than general-purpose moving blankets. I upgraded to foam panels after a year and noticed another 20% improvement.
What you can skip initially: Bass traps (the room’s low-frequency modes matter less for voice recording), expensive diffusers (you need absorption first), complete room coverage (treat the first reflection points around your mic, not every wall). I see people spending $500+ on acoustic treatment when $50-100 of strategic panels delivers 80% of the benefit.
The reflection points that matter most sit directly behind you, to your left and right, and on the ceiling above the mic. Treat these spots first, then evaluate whether additional treatment helps.
Final Verdict: Should You Buy the AT2020?
Yes, if you want the best sound quality under $150 and don’t mind buying an audio interface. No, if you need USB convenience or plan to record very quiet sources like ASMR.
After six years and hundreds of hours of recording, here’s my honest assessment.
Best value proposition
Price-to-performance score: 9/10. The AT2020 delivers 80-85% of what mics costing 2-3x more provide. That remaining 15-20% improvement costs exponentially more and matters primarily for commercial music production.
When it’s the smartest choice: You’re starting a podcast, YouTube channel, or streaming career. You want noticeably better sound than USB mics provide. You have $160-220 total budget for mic plus interface. You record in reasonably controlled environments. You plan to grow your audio setup over time.
I recommend this mic constantly to beginners, and I’ve yet to hear anyone say they regretted the purchase. The complaints I hear typically stem from unrealistic expectations (it won’t sound like a $2,000 Neumann) or improper setup (no acoustic treatment, wrong gain staging).
Deal breakers to consider
Must-have: Budget an additional $75-150 for an audio interface. If you can’t or won’t buy an interface, get the AT2020USB+ or another USB mic instead. The XLR version simply will not work without one.
Must-accept: Self-noise in quiet passages if recording whisper-quiet content. The 20 dB self-noise makes this mic unsuitable for ASMR, meditation recordings, or other ultra-quiet applications. For normal speaking voices and music, you won’t notice it.
The learning curve is steeper than USB alternatives. You’ll need to understand phantom power, gain staging, and XLR connections. For me, that learning curve proved valuable. For others who want plug-and-play simplicity, it’s a barrier.
My recommendation by use case
Podcasting: 9/10. Nearly perfect for this application! The cardioid pattern rejects room noise, the bright character adds clarity for spoken word, and the price fits podcast budgets. Only loses a point for requiring an interface.
Music recording: 7/10. Great for demos and practice recordings. Solid for acoustic instruments. Less ideal for professional releases where the self-noise and frequency response quirks become noticeable. You can make it work, but you’ll eventually want an upgrade.
Streaming: 8/10. Sounds significantly better than gaming headset mics or cheap USB options. The XLR setup looks more professional on camera. Loses points because streamers often need their hands free and benefit from USB simplicity, plus many streaming spaces aren’t acoustically treated.
Voiceover work: 8/10. Professional sound quality for most voiceover applications. The bright character helps voices cut through videos and presentations. Suitable for YouTube voiceovers, e-learning, audiobooks, and many commercial projects. Only high-end broadcast voiceover demands better equipment.
Frequently Asked Questions About the AT2020
Does the AT2020 need phantom power?
Yes! The AT2020 requires 11-52V phantom power provided by an audio interface. It will not work without phantom power enabled.
Can I use the AT2020 without an audio interface?
No. The XLR version requires an interface. Consider the AT2020USB+ if you want direct computer connection without an interface.
Why does my AT2020 sound muffled?
Check three things in this order: (1) Confirm phantom power is turned on at your interface, (2) Verify you’re speaking into the front of the mic (the side with the Audio-Technica logo), (3) Increase your interface gain. Muffled sound usually means insufficient gain or speaking into the wrong side of the mic.
Is the AT2020 good for singing?
Yes for home recording and demos! The AT2020 captures vocals well enough for practice recordings, YouTube covers, and songwriting demos. Professional studio recordings benefit from lower self-noise and flatter response of pricier mics like the Rode NT1-A or Neumann TLM 103.
How do I reduce background noise on AT2020?
Position the mic correctly (speak into the front, keep noise sources behind or to the sides), reduce gain to appropriate levels (don’t crank it unnecessarily high), add basic acoustic treatment (moving blankets on nearby walls), and use a noise gate plugin in your recording software. The cardioid pattern naturally rejects off-axis sound when positioned properly.
Does the AT2020 work with Focusrite Scarlett?
Yes, perfectly! The Focusrite Scarlett series (Solo, 2i2, 4i4) provides clean phantom power and adequate gain for the AT2020. This combination represents one of the most popular budget setups for podcasting and content creation. I personally use an AT2020 with a Scarlett 2i2 3rd Gen.
What’s better for podcasting: AT2020 or Blue Yeti?
AT2020 for sound quality and background rejection. Blue Yeti for USB convenience and zero learning curve. If you have or plan to buy an interface, choose the AT2020. If you want plug-and-play simplicity and never plan to expand your setup, the Blue Yeti works fine.
Can the AT2020 handle loud sources?
Yes! The 144 dB SPL maximum handles normal vocals, acoustic guitars, and most acoustic instruments comfortably. Not suitable for close-miking loud guitar amplifiers, drum overheads, or other extreme SPL sources. For typical content creation and music recording, the headroom is more than sufficient.
Why does my AT2020 pick up everything?
Condenser mics are highly sensitive by design. Make sure you’re using the cardioid pattern correctly (sound source in front, unwanted noise to sides and rear), add acoustic treatment to reduce room reflections, position farther from computer fans and air conditioning, and consider whether a dynamic mic like the Shure SM58 might suit your noisy environment better.
Is the AT2020 still good in 2025?
Absolutely! The core technology hasn’t changed, and neither have the fundamentals of good sound. While newer mics exist, the AT2020 remains the best value in the $99 price range. I bought mine in 2019 and still use it regularly in 2025 alongside much more expensive microphones.
The AT2020 proves that you don’t need to spend $500+ to get professional sound quality. You need proper technique, basic acoustic treatment, and realistic expectations. This mic delivers all the sound quality most creators actually need. Everything beyond this becomes incremental improvements rather than game-changers.
Buy it, learn to use it properly, and focus on creating great content. Your audience cares far more about what you’re saying than the subtle technical differences between a $99 mic and a $999 mic!
Streamers upgrading from USB mics discover what actual audio quality sounds like! The difference between a $50 USB mic and the AT2020 through a decent interface is night and day.
There are some affiliate links on this page that will redirect you directly to the original products and services. Also by buying through those links you will be supporting us. So thank you ^.^
Related Posts
- Best USB Microphone Models Under $150
- Large Diaphragm Condenser Microphone: Top 10 in the Market
- Parabolic Microphone
- Blue Yeti Microphone Review: Hidden Truth
- Maono Microphone Review
- Ribbon Microphone: The Top 10 in the Market
- Best Under $100 Condenser Mic
- Best of the Most Expensive Microphones to Buy
- Field Recording Microphone
- Different Types of Microphones and Their Features