Ever heard a podcast where the hosts keep cutting each other off, the mics sound uneven, or there’s an annoying echo?
That’s what a bad setup sounds like—and it’s way more common than you think.
If you’re recording with two co-hosts, you can’t afford a sloppy setup. One bad mic or missing headphone jack can kill the vibe (and your audio quality).
🎯 Here’s the good news: You don’t need to spend thousands to sound pro.
🎧 I’ve helped dozens of small podcasts build killer 3-host rigs under $600—and some even went on to land Spotify placements.
In this guide, I’ll walk you through exactly what gear you need, what to avoid, and how to set it all up—no fluff, no tech jargon.
You’ll know what to buy, how to connect everything, and how to avoid audio disasters.
💡 Fun stat: 70% of podcasts never make it past episode 10.
One big reason? Poor audio setups.
I’ve been there too.
But once I figured out the right gear combo—everything changed.
Let’s make sure your show starts strong.
Let’s build your ultimate 3-person podcast setup.
Choosing the Right Microphones
Select what suits you the most
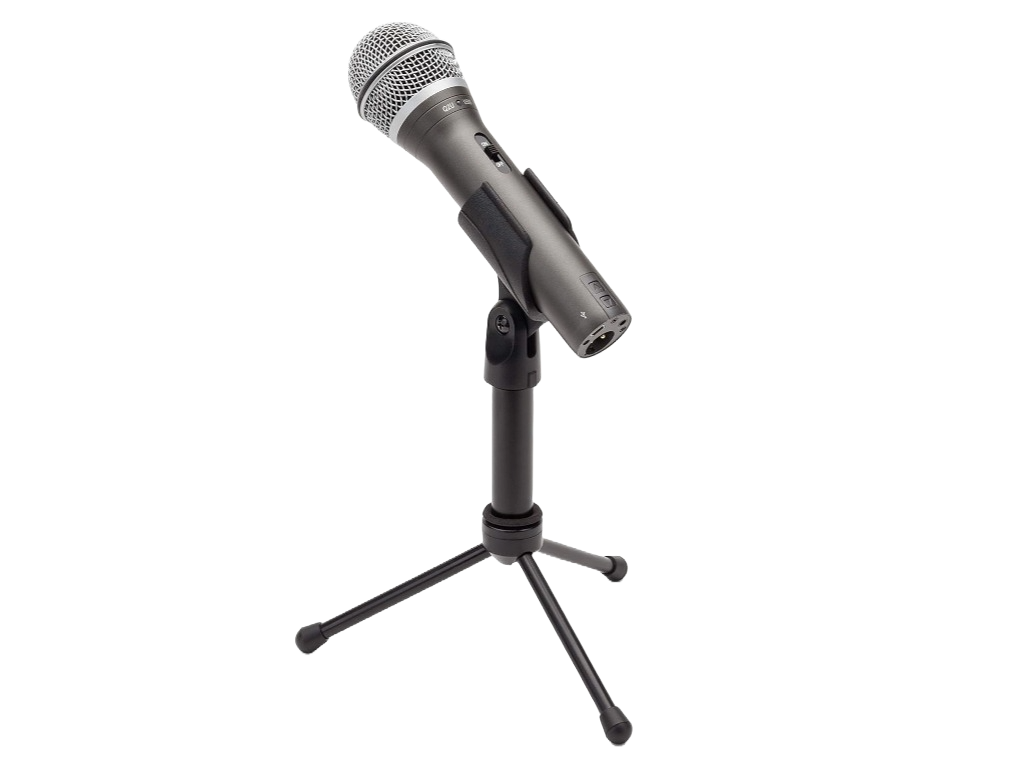
SAMSON Q2U
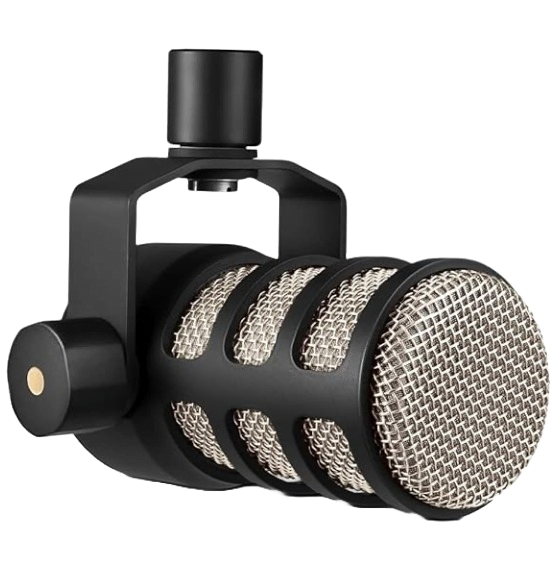
PODMIC
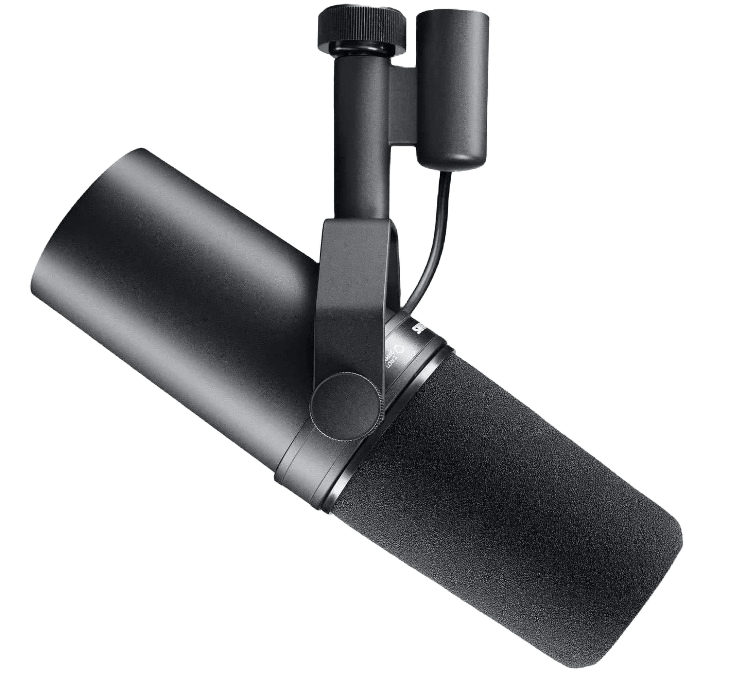
SHURE SM7B
Dynamic vs Condenser
Short answer: Use dynamic mics.
Why? Because dynamic microphones reject background noise much better. In a 3-person setup, you don’t want sensitive condensers picking up each other’s voices. Trust me, I tried running three AT2020s (condensers) in a small room and it was a nightmare. Tons of mic bleed. Tons of editing. With dynamic mics like the Samson Q2U or Shure MV7, that problem basically disappears. 🎙️ Condensers are fine for solo voiceovers in treated rooms, not tight podcast tables.

XLR vs USB
USB mics are simple and plug-and-play, great for beginners or solo podcasters. But they struggle with multiple hosts due to syncing and quality limits.
XLR mics need an interface or mixer but deliver cleaner, professional sound and full control. They’re the preferred choice for multi-person podcasts because they avoid latency and volume issues.
If you want easy setup, USB works—but for flexibility and top-notch quality, go XLR every time.
Mic Polar Patterns: Avoiding Bleed and Crosstalk
Stick to cardioid pattern mics.
It’s the best for rejecting sound from the sides. You don’t need omnidirectional mics unless you want background noise (you don’t).
Supercardioid mics work too, but placement becomes tricky.
I once placed a supercardioid mic wrong and it picked up my laptop fan louder than my voice 😩.
Always check the mic’s polar pattern before buying.
Cardioid = cleaner trio recordings,
less editing, and happier listeners.
🎤 “If your mic can hear the air conditioner across the room, you’ve got the wrong mic for podcasting.” – Jeff Towne, Transom.org
According to Buzzsprout’s Podcast Stats 2024, poor mic quality is the #1 reason listeners abandon new shows after 2 minutes. (source) That’s how serious this choice is.
So: Go dynamic. Stick with cardioid. Avoid condensers unless you’re in a treated studio.
You’ll thank yourself every time you edit.
Best 3 Person audio interface for podcasting
Podcast setup – Audio Interface
An audio interface is like the bridge that connects your microphone or other audio sources to your computer. Imagine it as the translator between the real world sound and the digital world your computer understands.
For a 3 person podcast setup, you need something with at least 3 mic inputs. Period.
USB mics won’t cut it here—they don’t sync properly without major headaches.
I tried mixing three USB mics once, and the latency made everything sound like a haunted Zoom call. It was unusable.
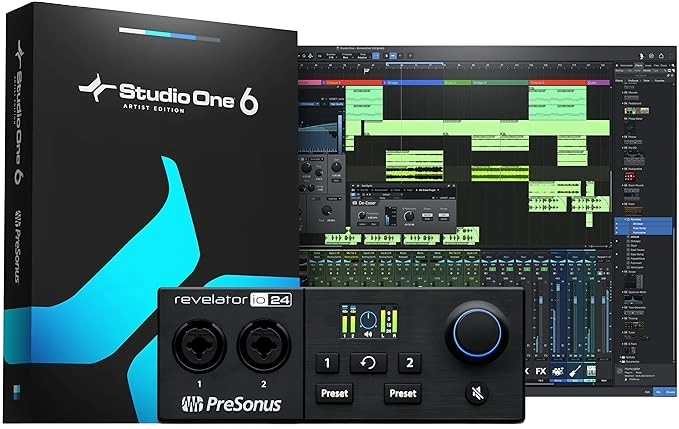
PreSonus Revelator io24
The StudioLive Voice Effects presets, tailored for podcast vocals, creates excellent clarity. The Bluetooth 5.0 connectivity enables hassle-free integration of remote guests or phone interviews. Dual headphone outputs with individual volume control accommodate multiple hosts or guests for seamless real-time monitoring. The bundled Studio One Artist software supports recording, editing, and production processes. Notably, the loopback functionality makes including external audio simple, which streamlines content.
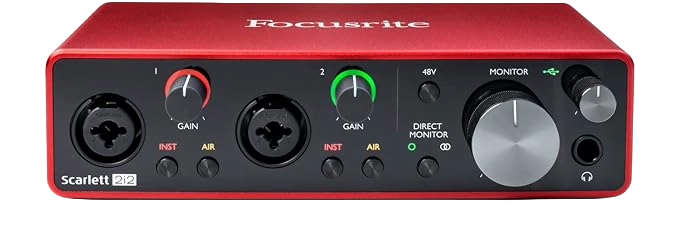
Focusrite Scarlett 2i2
The Focusrite Scarlett 2i2 with its two high-quality microphone preamps and sample rates up to 24-bit/192kHz, it captures audio with remarkable clarity and detail. The 2i2’s versatile inputs accommodate both XLR and 1/4″ connections, allowing you to connect microphones, instruments, or line-level sources. Designed for ease of use, the 2i2 features intuitive gain controls, direct monitoring options, and easily accessible headphone and speaker outputs. Its “Air” mode adds a subtle brightness to recordings, enhancing vocal presence.
RODECaster Pro
The RØDECaster Pro is the world’s most powerful all-in-one solution for podcasting and live streaming. It offers superb audio quality and expansive features while being incredibly easy to use, making it the ultimate tool for beginners and professionals alike. It includes four microphone inputs with studio-grade preamps for recording crystal-clear audio, as well as smartphone, USB, and Bluetooth channels. Eight programmable sound pads, with eight banks available allow you to load up to 64 sounds for instant playback during your podcast or stream

USB Interface pros & cons for 3 mics
If you’re on a budget, a USB audio interface with 4 XLR inputs like the Focusrite Scarlett 18i8 or Behringer UMC404HD is your best bet.
They plug straight into your laptop and record clean, isolated tracks.
I’ve used both, and while the Focusrite is cleaner and better-built, the Behringer offers surprising quality for under $200.
The downside? No onboard controls.
You’ll need to monitor and adjust everything from your DAW.
Also, no real-time mix for guests unless you add a headphone amp, which adds cost.
Mixer benefits: onboard EQ & monitoring
If you want hands-on control, live EQ, and real-time monitoring for all three hosts, get a mixer.
The Zoom PodTrak P8 is built specifically for podcasting.
It gives you 6 mic inputs, separate headphone outputs, and it even records multitrack to an SD card—no laptop needed.
It’s like having a mini studio on your desk.
I used this for a remote podcasting road trip across Bangladesh, and the built-in touchscreen made life so much easier during spontaneous interviews.
Downside? It’s bulkier and pricier, around $500–$600.
Another solid pick is the Tascam Mixcast 4, which has better touchscreen UX than the Rodecaster (yes, really) and allows direct DAW integration.
But the Rodecaster Pro II, while flashy, sometimes suffers from firmware issues and has a steep learning curve if you’re new.
🎙️ “Podcast audio is 90% gear, 10% editing,” says Alex Nelson, audio engineer at MicDrop Studio. Interfaces give you clarity; mixers give you control.
In short:
If you’re editing post-recording, go with an interface.
If you want plug-and-play plus live monitoring, go mixer.
👉 Pro Tip: Whatever you choose, avoid anything with fewer than 4 XLR ports—you’ll need the headroom, trust me.
Headphones & Monitoring
Use headphones always. Unless you are Andrew Tate. He hates it.
While some may prefer to go without, using headphones with mic during recording is a game-changer for most podcasters.
Without them, someone’s mic will pick up the others’ voices, and it’ll sound like a cheap Zoom call.
Always go for closed-back headphones like the Audio-Technica ATH-M30x or Sony MDR-7506—both under $100, super clear, and they block bleed like a champ.
I’ve used both, and while the Sonys sound brighter, the ATs feel comfier during long 2-hour episodes (especially if you sweat a lot like me 😅).
For a 3-person setup, one headphone jack isn’t enough.
Most audio interfaces or mixers only have a single output.
You’ll need a headphone splitter amp like the Behringer HA400 (super cheap, works great) or the ART HeadAMP4 if you want individual volume controls.
This solves the “can you make my mic louder?” problem fast.
Without one, trust me, someone will yank their headphones off mid-show.
Happened to me once—co-host thought he went deaf.
And let’s talk latency—if you’re using USB interfaces like the Focusrite Scarlett 2i2 with software monitoring, you’ll hear a slight delay that’s super distracting.
You need direct monitoring—no delay—so either get an interface that has it built-in, or a mixer like the Rodecaster Duo, which is honestly a beast for live monitoring and routing.
Downside? It’s pricey, and overkill if you’re just starting.
🔍 Stat you should care about: According to Riverside.fm’s 2024 audio survey, 63% of podcasters said poor monitoring caused recording errors they didn’t catch until post—which often means re-recording.
Brutal.
If you want visual monitoring, in-ear monitors (IEMs) are another option, especially if you’re filming your podcast and want a cleaner look.
But be warned—cheap IEMs can sound flat and lifeless.
I tried KZ ZS10 Pro once, and while it looked great on cam, I missed so much bass that I almost uploaded a muddy mix.
🎤 Quick Tip from pro audio engineer Chris Curran (Podcast Engineering School):
“Never trust your speakers—always monitor with good closed-back headphones. What you don’t hear will hurt you later.”
In short: Get 3 solid headphones, use a splitter amp, and make sure latency is zero.
Ignore this, and your podcast will sound like it was recorded in a tin can.
Recommended Cables, Stands & Mounts
Podcast Setup – Accessories
You can have the best mics in the world, but if your cables are noisy, your stands keep falling, or your mounts shake with every laugh, the episode’s ruined.
I learned this the hard way when my guest accidentally knocked his stand mid-recording—and 10 minutes of audio were just unusable hums and mic thumps.
Let’s avoid that mess.
Here’s the must-have gear you need for a solid, clean, and frustration-free 3 person podcast setup.
Balanced XLR Cables—Why They Matter
Never use unbalanced or cheap aux cables.
Balanced XLRs cut out interference and reduce static noise, especially with long cable runs.
I use Mogami Silver Series XLRs, not because they’re flashy, but because they’ve lasted me 3 years without a single buzz.
Cheaper brands like Amazon Basics work fine short-term but may fray or pick up interference near power outlets or routers.
According to Rode, balanced XLRs reduce electromagnetic noise by up to 50%—a huge win for clean audio.
Boom Arms vs. Desktop Stands: Stability & Placement
Boom arms win—always.
They free up table space, reduce hand bumps, and let each host adjust mic angles without hassle.
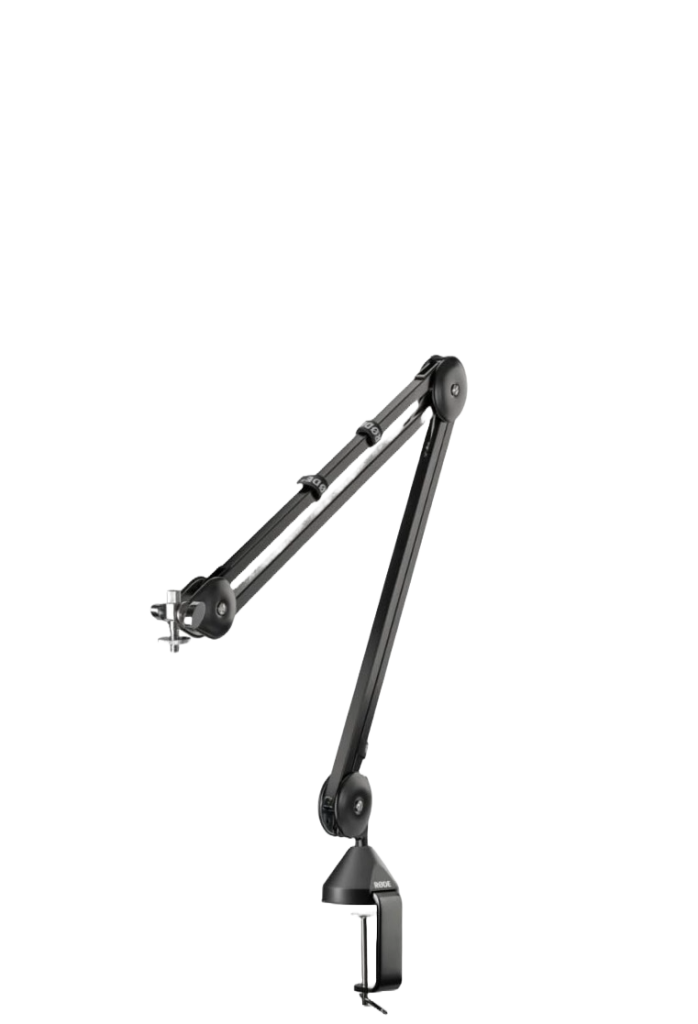
I’ve used the Rode PSA1+ and it’s buttery smooth—holds heavy mics like the SM7B without droop.
Cheaper arms like the Neewer NB-35 are okay for lightweight mics but squeak after a few months.
If you’re tight on budget, desktop tripod stands can work, but they pick up every table tap, and mic placement gets awkward fast.
Your audio suffers more than you think.
As Pat Flynn once said, “If you want pro sound, treat your mic like a pro—don’t just sit it on the table and pray.”
Cable Management Tips for a Clean Setup
Loose cables kill both workflow and vibe.
I’ve had guests trip on floor wires (not fun mid-recording).
Use velcro straps, under-table clips, or even 3M command hooks to route everything cleanly.
You’ll reduce the chance of gear damage and avoid those nasty yanks that break mic connectors.
Bonus: It looks 10x more professional on camera if you’re recording video.
Also, wrap your XLRs in over-under style—it extends lifespan and reduces tangles.
💡 According to Shure, improperly managed mic cables are one of the top 3 causes of signal dropouts and noise issues in home studios (Shure Resource Library).
If you’re serious about podcasting with three people, don’t treat cables and stands like afterthoughts.
They’re the silent backbone of a smooth session.
Ignore them, and you’ll hear the consequences.
RODE PSA1 Boom Arm
Shock mount
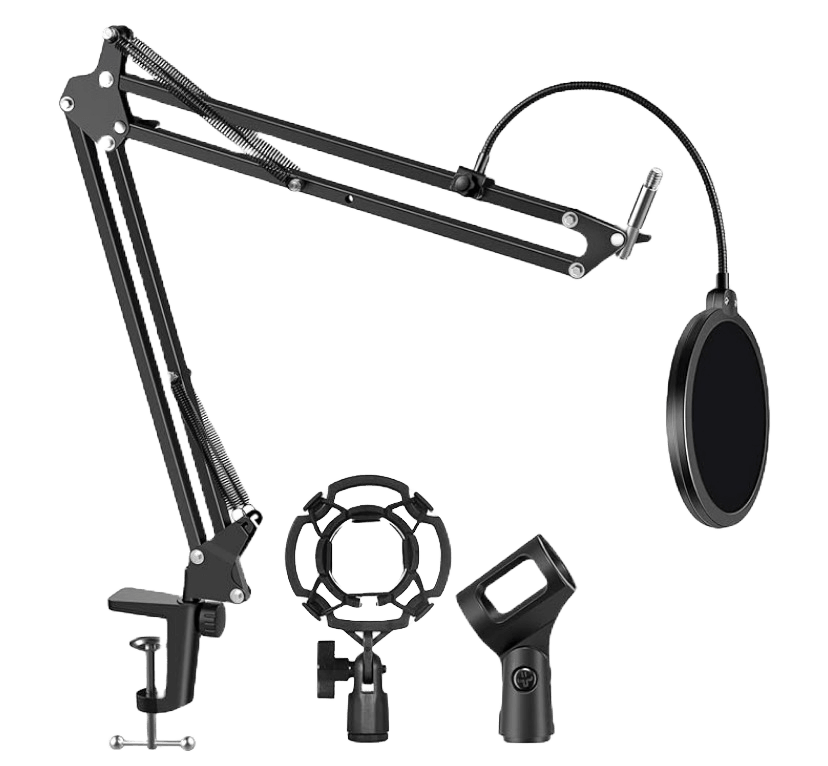
Foam ball

Optimizing Your Recording Space
Your gear is only as good as the space you’re recording in.
Even the best $500 mic can sound trashy in a bad room. 🎤
I learned this the hard way—three of us were recording in a living room with tile floors and bare walls.
It echoed so bad I had to EQ out entire frequencies, and it still sounded like we were in a cave.
Basic acoustic treatment on a budget
Start with the walls.
Bare walls bounce sound—hang up thick curtains, moving blankets, or even clothes behind each mic.
Add foam panels in reflection spots (behind the speaker, across from them, and on the ceiling if needed).
You don’t need a full studio.
I once used $10 yoga mats on the wall—they worked better than Amazon foam panels I wasted $30 on.
And if you’re on carpet, that’s already helping your floor reflections.
Want numbers?
A study from GIK Acoustics showed midrange reflection was cut by 47% with basic corner traps and panels. (source)
Mic placement to reduce room reflections
Keep mics close to the mouth—4 to 6 inches max.
Use pop filters or foam windscreens to reduce plosives.
Aim them slightly off-axis (not straight at the mouth) to reduce sibilance and mouth clicks.
Never point the back of the mic toward a wall—especially if you’re using condensers.
I once placed a condenser mic facing a glass window and didn’t notice until post.
It ruined the whole episode.
Dynamic mics like the Shure SM58 or PodMic are way more forgiving—they reject room noise better.
But they still need good placement.
For group setups, keep each mic at a different angle to avoid bleed.
Lighting & camera angles (if recording video)
If you’re also filming the podcast, don’t just slap a ring light on everyone’s face.
That’s lazy.
Use softbox lights at a 45° angle for a natural look.
I use a Neewer LED panel with adjustable color temp—it matches daylight and avoids the weird yellow cast you see in so many videos.
And about camera angles: keep it eye-level, not looking down or up anyone’s nose.
For three people, either go one wide shot or a main cam + two closeups.
Avoid harsh shadows—bad lighting makes your podcast look amateur, even if it sounds great.
Pro videographer Sara Dietschy once said, “Lighting tells people whether to take you seriously—even before you speak.”
She’s right.
➡️ Bottom line: A $300 mic in a treated room sounds better than a $1000 mic in an untreated one.
Invest in your space just like your gear.
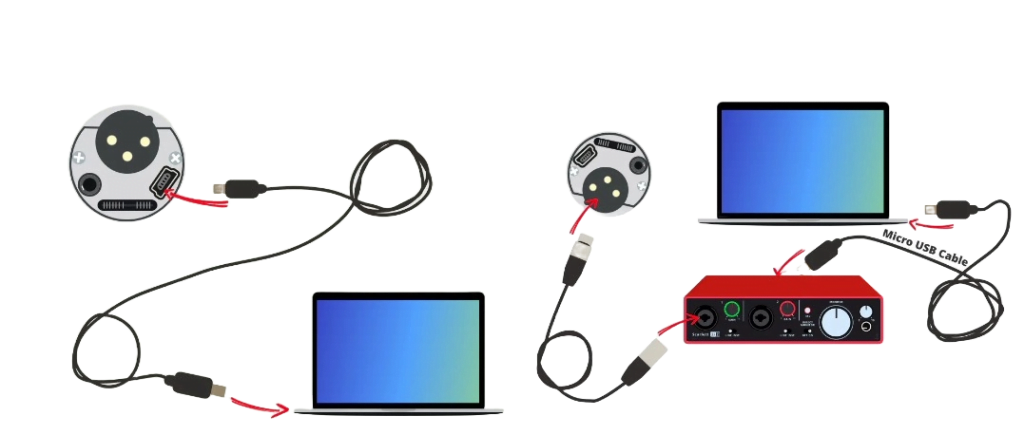
Step‑by‑Step Setup & Signal Flow
Here’s how to connect a 3 person podcast setup properly—without frying your gear or wasting hours debugging noise.
Most beginners mess this up by just plugging stuff in randomly.
Don’t be that person.
Follow this exact chain, and you’re golden.
Connecting mics to interface/mixer
Plug each XLR mic into its own dedicated input on your audio interface or mixer.
Don’t use splitters.
I used to think daisy-chaining two mics to one input would save money.
It doesn’t.
It ruins clarity and adds phase issues.
If you’re using something like the Focusrite Scarlett 18i8, you’ll have four clean XLRs—perfect for three hosts and a guest.
If you’re using a RODECaster Pro II, it’s even simpler: color-coded channels, built-in FX, and auto-gain.
But be warned—RODE’s onboard processing can be too aggressive.
I turn off the compressor and tweak later in post.
Routing channels and setting gain staging
Start with gain knobs turned all the way down.
Speak into the mic.
Slowly increase gain until your voice peaks at around -12dB to -6dB on the meter.
Don’t go above that unless you like distortion.
My co-host used to shout into the mic and we’d clip constantly.
I now limit everyone’s gain in hardware, especially with interfaces that don’t have limiter options.
If you’re using software like Logic Pro or Reaper, set individual input gains there too.
And make sure phantom power is off unless you’re using condenser mics—yes, I fried a dynamic mic once by accidentally flipping that switch 😬.
Monitoring mix: talkback and headphone mixes
You need separate headphone outs for all three hosts.
Don’t cheap out here.
If your interface doesn’t have multiple outs, get a Behringer HA400 ($25 lifesaver) or ART HeadAmp4.
It splits the signal, keeps volumes separate, and avoids the “you’re too loud in my ears” complaints.
If you want to get fancy, some mixers like the Zoom Livetrak L-8 let each host control their own mix—pure luxury at under $400.
Just make sure you test your monitor mix before recording.
Once, we recorded a full episode only to find out one of the headphones was disconnected.
No one noticed until editing—and the host was off-mic the whole time.
Pro Tip from podcast audio engineer Tom Kelly (@cleanpodcastaudio):
“90% of bad recordings I fix come from bad gain staging. Learn it once—save your show forever.”
Also, don’t forget cables.
Use balanced XLRs, not cheap aux adapters.
I once saved $10 and got a buzzing channel for life.
Lesson learned.
Bottom line?
Keep your signal clean, test each input, and build your setup like a pro—one step at a time.
Software & Recording Tips
Recording 3 voices at once isn’t just about plugging in mics—it’s about managing gain, keeping files clean, and preventing latency issues.
You’ll need software that lets you record all 3 speakers on separate tracks so you can fix mistakes later without ruining the whole episode.
The best DAW for that? Reaper.
It’s lightweight, fully customizable, and just $60 (after a free trial).
I’ve used it for years—it never crashes mid-recording, and the routing system is insanely powerful once you get used to it.
Audacity works too, but it feels dated and lacks real-time monitoring and proper multitrack controls.
If you’re just starting out and need something visual and intuitive, Hindenburg Journalist is amazing—it auto-levels voices and organizes clips like magic, but it’s pricey and not super customizable.
I once lost a full episode in GarageBand due to corrupt project files (never again 😑), so I avoid it for multi-host shows.
Setting up input presets and templates
Always save templates.
It cuts setup time in half.
In Reaper, I have a template saved with my 3 tracks already routed, EQ applied, and volume levels set.
So every time I hit record, it just works.
This tiny workflow hack has saved me hours—and my sanity.
If you’re using a mixer like the Rodecaster Pro II or Zoom PodTrak P8, most let you create show presets, which load up mic levels, FX, music pads, and even routing.
Snapshots: saving mixer settings between episodes
Don’t re-do settings every time—use mixer snapshots.
The Rodecaster Pro II lets you save multiple show profiles.
I switch between “Studio Mode” (for in-person) and “Remote Guests” (with a laptop-in feed).
If you’re on a budget mixer that lacks this, take a photo of your knobs/settings.
It’s old-school, but trust me—it helps.
One week I didn’t save my setup and ended up recording an entire episode with two co-hosts panned to the same channel… not fun 😬.
🎯 Quick tip: Turn on auto-backup in your DAW, especially if you’re recording over an hour.
According to a report by Backblaze, 1 in 20 hard drives fail every year (source).
One crash, and you’re done.
Keep files backed up—cloud or external.
If you want zero setup drama and minimal post-production, use Riverside.fm or Zencastr.
They record each guest locally in high-res, then upload automatically.
The downside? It’s browser-based, so glitches happen.
I once had a guest freeze mid-sentence and the audio got desynced—we had to redo the whole thing.
So yeah, use with caution.
Bottom line?
Use a DAW that supports multitrack recording, save templates, and back everything up.
Those three steps can save your entire podcast.
Budget vs. Premium Combos
Not everyone has $1,000+ to drop on gear—and that’s okay.
Whether you’re just starting or upgrading, here’s exactly what to get based on your budget.
Let’s break it down 👇
Under $500 “Bare Essentials” Kit
If you’re broke (like I was), this setup still gets you clean sound.
For mics, go with 3x Samson Q2U—they’re USB/XLR hybrid, so you can use them directly into a computer or upgrade later with an interface.
At ~$60 each, they punch way above their price with crisp clarity and low noise.
They’re dynamic, so they reject background noise like a charm, but you’ll need to be close to the mic.
For the interface, get a Maono AME2 or Behringer UMC404HD (~$130) which handles 4 mics and offers solid preamps for the price.
I once recorded a panel with this exact rig in a hotel room with no treatment—still sounded podcast-worthy.
Headphones? Grab 3x Sony MDR-7506 clones (like OneOdio) for ~$30 a pop—they isolate well enough and let everyone monitor.
Throw in cheap boom arms (Neewer or InnoGear), XLR cables, and you’re all set.
Sure, you won’t get pro-level warmth or depth, but your listeners won’t care if your content is 🔥.
$500–$1,000 “Balanced Starter” Rig
Want a noticeable upgrade?
Swap the mics for 3x Shure MV7 (~$250 each) if you’re okay with a semi-premium feel.
These are USB/XLR too, so future-proof.
They sound 80% like the famous SM7B with less gain-hungry demands.
Combine with a Focusrite Scarlett 18i8 or Tascam Model 12 for more control and better preamps.
I used the Tascam on a branded show last year—it saved my life with onboard EQ and multi-track recording.
Bonus: it can act as a mixer and recorder without a computer.
You’ll want real monitoring now—Audio-Technica ATH-M50x or Beyerdynamic DT 770 Pro are great choices under $150.
They’re comfortable for long sessions and brutally honest (which can be painful but helpful 😅).
Add a Behringer HA400 headphone amp to split signal cleanly.
Only downside? It adds complexity—routing, gain-staging, and cables become a mini jungle.
But if you’re serious, it’s 100% worth it.
$1,000+ “Pro-Level” Ultimate Gear List
Alright, now we’re cooking.
If you’re ready to build something broadcast-ready, go with 3x Shure SM7B—they’re industry-standard for a reason.
Crystal-clear mids, forgiving highs, and rich presence, especially for close-up voices.
But they’re gain-hungry, so you’ll need 3x Cloudlifters or a mixer with 60dB+ clean gain.
I use the RODECaster Pro II, which eliminates the need for inline boosters, adds smart pads, multi-track SD recording, Bluetooth calls, and even built-in processing like de-essing and noise gating.
It’s overkill for some, but I can’t imagine my studio without it now.
For headphones, Beyerdynamic DT 990 Pro (open-back) gives better soundstage if you’re not worried about bleed.
Use XLR Mogami Gold cables, Gator Frameworks boom arms, and IsoAcoustics stands to isolate vibrations.
Every part makes a difference at this level—even mounts.
One downside? Price adds up fast.
Expect $1,800+ total.
But if you’re podcasting professionally or want zero compromises, this is it.
🎙️Expert Insight: “Sound quality can be the difference between a podcast that grows and one that dies in obscurity.” — Jordan Harbinger, Host of The Jordan Harbinger Show (via Podcast Magazine)
In short:
💸 Under $500 = functional but basic
💡 $500–$1K = semi-pro flexibility
🚀 $1K+ = full-blown studio-grade
Pick based on your real goals, not the gear hype.
Your voice matters more than your mic, but good tools remove friction—and that’s how consistent podcasts thrive.
Troubleshooting Common Issues
When you’re running a 3 person podcast setup, some problems are almost guaranteed—hum, buzz, mic bleed, phase issues, and latency can all sneak in.
Here’s how to fix them quickly, without wasting hours.
Hums and buzzes? Usually, it’s a ground loop or cheap cables.
I once spent a whole episode trying to fix a nasty buzz, only to realize swapping to quality balanced XLR cables eliminated it instantly.
It’s worth investing here—cheap cables cause more headaches than gear itself.
According to a Sweetwater study, over 40% of audio issues in podcasts come from bad cabling and grounding problems.
So, don’t skip on this.
Mic bleed and phase issues happen when mics pick up each other’s sound, causing that weird hollow or echo effect.
The fix? Proper mic placement and choosing mics with tight cardioid or hypercardioid patterns.
I learned this the hard way—my early setup had mics too close, and voices sounded muddy.
Pro audio engineer Bruce Bartlett says, “Phase cancellation ruins clarity, so spacing and polar patterns are key.”
Simple moves like angling mics away from each other and using isolation shields can save your audio.
Latency and software crashes often come from poor USB interfaces or running too many apps at once.
I recommend investing in an audio interface with low-latency drivers like the Focusrite Scarlett series, which consistently scores high in podcast reviews for reliability.
Keep your DAW and plugins updated, and close unused programs to avoid crashes.
Over 30% of podcasters report latency as a frequent issue (Podcast Insights).
Troubleshooting is part of the game, but knowing these quick fixes will keep your 3 person podcast setup running smooth and stress-free.
I still have my “emergency cable kit” and some spare XLRs ready—because trust me, tech fails happen at the worst times! 🎙️
If you want, I can share my full troubleshooting checklist that’s saved my podcast more times than I can count.
Podcasting is a different game, and without a precise blueprint, the game will get tougher midway. Grow your podcast from scratch with Zero Audience and learn about how successful podcasters cracked the code by winning our Free Guide with step by step Guidelines.
Get your complete podcast equipment setup by visiting Podcast Equipment Bundle. Don’t let the side projects kill your time. Get in touch with podcasting services and experts those will save you tons of time at Podcast Production Services.
With that being said, Let’s connect with all such free and paid tool/services you might need knowingly or unknowingly to fuel your growth. Here’s 21 BEST AI TOOLS AND PLATFORMS TO GROW YOUR PODCAST AND CONTENTS. There are some bonus tools in the end too to make your day to day life easier.
There are some affiliate links on this page that will redirect you directly to the original products and services. Also by buying through those links you will be supporting us. So thank you ^.^